


As someone who's spent years in the field, I can't stress enough how vital handrails are in any home. They play a crucial role in preventing falls and accidents on stairs, ramps, and other elevated areas, whether they're installed inside or outside.
In this guide, I'll walk you through everything you need to know about handrail installation yourself, both indoors and outdoors, and share some expert tips on choosing the right type and avoiding common mistakes.
Types of Handrails for DIY Installation
When you're planning to install handrails yourself, it's essential to know the difference between wall-mounted and stair-mounted options. Each type has its unique benefits and is suited for different spaces in your home.
1. Wall-Mounted Handrails
-
Wooden Handrails: Perfect for interior hallways and stairwells, wooden handrails are a classic choice. They're easy to cut to size and install with brackets directly onto walls. I love using wood because it offers a warm, traditional look and can be easily customized to match any room’s decor. Remember to use a stud finder to ensure you're securing the brackets into wall studs for maximum stability.
-
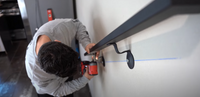
Metal Handrails: For those looking for a modern, sleek appearance, metal handrails made from stainless steel or aluminum are excellent choices for both indoor and outdoor walls. They come with modular components and pre-drilled brackets, making installation straightforward. These are especially useful in areas like basements or garages where durability is key. The key here is to ensure you’re using the right hardware for the type of wall you're mounting to, whether it’s drywall, brick, or concrete.

2. Stair-Mounted Handrails
-
Pre-assembled Wood Handrails: These are ideal for indoor staircases where you want a natural, classic look. They are relatively easy to handle and install, making them a fantastic option for beginners. Whether your stairs are straight or curved, wood handrails can be cut and adjusted to fit perfectly. Just make sure to measure accurately and use the right tools to avoid mistakes.
-
Cable Railing Systems: If you’re aiming for a contemporary look, cable railing systems are fantastic for open staircases, both indoors and outdoors. They offer a minimalist design while maintaining safety. The tensioning tools included in these kits are user-friendly, but you need to be precise with your measurements and adjustments to ensure a safe, secure fit.

Step-by-Step Guide to Installing Handrails Indoors
Starting a DIY project can seem daunting, but with careful planning and the right guidance, you can achieve professional installation. Let's dive into the step-by-step process for installing different types of handrails indoors.
Wooden Handrails
-
Gather Your Tools and Materials: Start by gathering everything you need—wooden handrail, brackets, screws, a drill, level, tape measure, pencil, stud finder, screwdriver, and a saw. Trust me, having everything ready will make the process go much smoother.
-
Measure and Plan the Handrail Placement: Measure the length of your staircase or hallway. Mark the desired height for the handrail on the wall, typically between 34 and 38 inches from the floor. Make light marks with a pencil to guide you.
-
Locate the Wall Studs: Use a stud finder to find the wall studs where the brackets will be attached. Mark these locations carefully; this step is crucial for ensuring the handrail is securely mounted and can support weight.
-
Mark the Bracket Positions: Hold each bracket against the wall at the marked stud locations and use a pencil to mark where the screws will go. Ensure they are all aligned and spaced evenly.
-
Pre-Drill Holes for the Brackets: Pre-drilling helps prevent the wood from splitting and makes it easier to screw in the brackets securely.
-
Attach the Brackets to the Wall: Position the brackets over the pre-drilled holes and secure them with screws. Make sure they are firmly attached and check alignment with a level.
-
Measure and Cut the Handrail to Fit: Measure the distance between the outermost brackets and cut the handrail to the correct length. Make sure your cuts are clean and straight for a polished finish.
-
Secure the Handrail to the Brackets: Place the handrail on the mounted brackets, center it, and secure it with screws. Start at one end and work your way to the other, ensuring it remains level.
Metal Handrails
-
Gather Your Tools and Materials: Get your metal handrail kit, drill, stud finder, tape measure, level, pencil, screwdriver or Allen wrench, and any other tools specified in your kit.
-
Measure and Plan Your Handrail Placement: Decide where the handrail will go and mark the desired height along the wall.
-
Locate the Wall Studs: Find and mark the studs along the wall where you plan to install the handrail.
-
Mark the Bracket Positions: Align the brackets at the marked stud locations and mark the screw holes.
-
Pre-Drill Holes for the Brackets: Pre-drill the holes to prevent the brackets from shifting and to make it easier to install the screws.
-
Attach the Brackets to the Wall: Secure the brackets to the wall, ensuring they are level.
-
Prepare the Metal Handrail: Measure and, if necessary, cut the metal handrail to the appropriate length. Be cautious while cutting; wear safety gloves and goggles.
-
Attach the Handrail to the Brackets: Align the handrail with the brackets and secure it with screws or bolts, ensuring it is stable.
Read also: Step-by-Step Guide: How to Attach a Handrail to a Wall
If you're a visual learner, check out our video guide on handrail installation:
Outdoor Handrail Installation
Once you're comfortable with indoor installations, you can move on to outdoor handrails. The process is quite similar, but you need to consider materials that can withstand weather elements. Vinyl and wrought iron handrails are top choices for outdoor use due to their durability and low maintenance.
Vinyl Handrails
- Gather Your Tools and Materials: Make sure you have your vinyl handrail kit, drill, tape measure, level, pencil, saw, screwdriver, and safety goggles.
- Measure and Plan Your Layout: Mark where each post will be placed on your porch or deck. Make sure the spacing meets your kit’s specifications.
- Install the Posts: Align each post with your marks and secure them to the deck surface using the brackets and screws from your kit.
- Measure and Cut the Vinyl Rails: Measure between each pair of posts and cut the rails to fit, ensuring straight cuts.
- Attach the Bottom Rail: Position and secure the bottom rail between the posts.
- Install the Balusters or Spindles: Place each baluster into the pre-drilled holes on the bottom rail.
- Attach the Top Rail: Secure the top rail over the balusters and ensure it is level and tightly fastened.
Common Mistakes to Avoid
Even with the best instructions, mistakes can happen, especially if you're new to DIY projects. Here are some common errors to watch out for:
- Incorrect Measurements: Always double-check your handrail measurements before cutting. "Measure twice, cut once" is a mantra for a reason! An incorrect measurement can lead to a handrail that's too short or too long, which can be both frustrating and costly.
- Not Finding Studs Properly: If you don't secure your handrail into wall studs, it won't be able to support weight properly, posing a safety risk. Make sure to use a stud finder correctly and mark each stud clearly.
- Over-Tightening Screws: This is particularly common with wooden handrails. Over-tightening can cause the wood to crack or split. Tighten screws just enough to hold the handrail securely in place.
- Misaligned Brackets: If your brackets aren't aligned correctly, your handrail won't be level, which not only looks unprofessional but can also be a tripping hazard. Use a level at every step of the process to ensure perfect alignment.
Challenges and Solutions
- Finding Secure Mounting Points: Use a stud finder and, if necessary, heavy-duty wall anchors to ensure the handrail is securely attached.
- Keeping the Handrail Level: Always use a level and consider a chalk line or laser level for stairs to keep everything perfectly aligned.
- Cutting the Handrail to the Right Length: Double-check measurements and use the right tools for clean, straight cuts.
By following this guide and avoiding common mistakes, you’ll save time, effort, and money, and you’ll end up with a professional-quality handrail installation. So, gather your tools, invite some friends or family over, and turn this DIY project into a fun, collaborative experience. Remember, every great project has a story, and who knows—you might just create some memorable moments along the way!


