


Wrought iron has always had a timeless charm. Whether it’s part of a fence, gate, stair railing, or garden bench, it brings that classic, sturdy look you just can’t fake with modern materials. But as beautiful and tough as it is, wrought iron isn’t immune to wear. Over time, rust shows up, paint starts peeling, and sometimes you’ll notice a little bend or crack that wasn’t there before.
The good news? Most of these problems can be caught early and even fixed without much trouble. You don’t have to let go of your favorite pieces or shell out for a replacement. I've been working with wrought iron for many years now, and from personal experience, I can tell you that most issues are easier to handle than they seem. That's why I want to share how to restore wrought iron in the easiest way possible so you can tackle it yourself with confidence.
Common Problems in Wrought Iron
Surface Rust and Corrosion
You’ll usually see rust as a reddish-brown coating on the surface, often forming around joints, welds, or spots where paint has chipped away. If it’s been sitting a while, the rust might start flaking or feel rough to the touch.
Peeling or Flaking Paint
Paint starts bubbling, cracking, or coming off in small chips, especially in areas exposed to sun, moisture, or temperature changes. If you gently scrape the surface and the paint comes off easily, it’s time for a refresh.
Structural Damage: Cracks, Bends, or Breaks
Look for visible cracks in joints or welds, bent sections (especially in thinner scrollwork), or complete breaks where parts of the structure have separated. You might also notice instability like wobbling or sagging.
Accumulation of Dirt and Grime
You’ll see dull patches, cobwebs, greenish mildew, or blackened buildup, usually in corners, scrolls, or tight spaces. It may not seem like a big issue, but grime traps moisture and speeds up rusting.
How to Restore Wrought Iron: The Techniques
Now that you’ve identified what the problem is, it’s time to start actually restoring your wrought iron. In this next section, we’ll walk you through the most common restoration techniques, each matched to the kind of problem you might be facing. From surface cleaning to structural repairs, I’ve got you covered with practical, straightforward solutions that anyone can follow.
Mechanical Cleaning
Tools:
-
Wire Brushes: If there’s one tool we reach for first, it’s a wire brush. Whether it’s handheld or a drill attachment, wire brushes are great for scrubbing away loose rust, flaking paint, and dirt. They're perfect for those tight corners and scroll details where rust likes to hide.
-
Sandpaper: Sandpaper is your go-to for smoothing things out once the loose stuff is gone. It helps level the surface, especially where paint has peeled unevenly. I usually recommend starting with medium grit (like 80–120) and working your way up to a finer grit if you want a smoother finish before painting.
-
Grinders: Grinders are ideal when you’re dealing with heavy rust or thick, stubborn layers of old paint that a wire brush just can’t handle. If you’ve got a bigger project or something that’s been neglected for a while, this tool saves time and effort. Just be sure to use a metal-appropriate disc and always wear your safety gear.
Methods
-
Manual Scrubbing
Pros:
-
Great for detailed work, curves, and intricate patterns.
-
Easier to control - you're less likely to damage the surface.
-
No electricity or special equipment needed, so it’s more budget-friendly.
What’s harder:
-
It takes time and a good bit of elbow grease.
-
Not ideal for large or heavily damaged surfaces.
-
Can be tiring, especially if you're dealing with thick rust or layers of old paint.
When it’s better:
Manual scrubbing is perfect for small jobs, touch-ups, or detailed ironwork like decorative gates, scrolls, or antique furniture where precision matters more than speed.
-
Power Tools
Pros:
-
Way faster and more efficient, especially on large flat surfaces.
-
Great for removing deep rust and heavy paint layers.
-
Saves you serious time on big jobs.
What’s harder:
-
There’s a learning curve; too much pressure can gouge the metal.
-
Can be overkill for delicate or ornate pieces.
-
Requires safety gear and a bit more setup (power, proper discs, etc.).
When it’s better:
Power tools are the go-to for fences, railings, gates, or any project where speed matters and the surface isn’t too intricate.
Chemical Treatments
When rust has really settled into the surface and you don’t want to grind the whole thing down, rust converters and removers can help with your wrought iron restoration. They’re chemical treatments that either dissolve rust (removers) or convert it into a stable, paintable surface (converters).
Rust Removers
These are typically acid-based and work by breaking down the rust entirely, leaving behind clean, bare metal.
-
Best for: When you want to fully strip the rust before priming and painting.
-
Tips: Use in a well-ventilated area and wear gloves; these are strong chemicals.
-
Extra Advice: Rinse the area thoroughly and let it dry completely before applying any paint or primer, or you might trap moisture underneath.
Rust Converters
Instead of removing rust, these react chemically with it, turning it into a black, stable coating that you can paint over directly.
-
Best for: Heavily rusted areas where sanding or grinding is impractical.
-
Tips: Apply evenly and don’t disturb the surface while it dries. It needs time to cure into that paintable layer.
-
Extra Advice: Rust converters aren't meant for shiny metal or freshly sanded areas. Only use them where rust is still present.
Safety Precautions When Restoring Wrought Iron Using Chemicals
Protective Gear Is Non-Negotiable
Always wear gloves, preferably chemical-resistant ones like nitrile or rubber, not those thin, disposable kitchen gloves. Rust removers and converters often contain strong acids or solvents that can burn or irritate your skin.
Add safety goggles to the list, especially if you're using sprays or working overhead. You don’t want any splashes getting near your eyes. If the product has strong fumes, a dust mask or respirator is a smart move too, especially if you’re in a poorly ventilated area.
Work in a Well-Ventilated Area
A lot of these chemicals give off fumes that aren’t great for your lungs. If you’re indoors, crack open windows and use fans to keep the air moving. Outdoors is always better when possible, especially for spraying or soaking parts in rust remover.
Read Labels, Follow Instructions
Every product has its own formula, and that means different usage instructions. Some need rinsing after application, others don't. Some react with paint, others are paint-friendly. Misusing a product could damage your piece or even compromise the results long-term.
Store and Dispose Safely
After you’re done, make sure lids are tightly sealed, and store chemicals somewhere cool, dry, and away from direct sunlight or heat. Don’t pour leftovers down the drain unless the label says it's safe to do so; many need to be taken to a hazardous waste facility.
Painting and Sealing
Importance of Priming Before Painting Wrought Iron
Priming isn’t just an optional step. It’s the foundation that makes the whole paint job last. Wrought iron is prone to rust, and primer acts as a barrier that protects the bare metal underneath. Without it, paint can peel, bubble, or flake off within months, especially in outdoor or high-humidity areas.
A good metal primer does three main things:
-
Seals the surface, so moisture doesn’t sneak underneath the paint.
-
Improves paint adhesion, helping it stick better and last longer.
-
Smooths out small imperfections, making your final finish look more professional.
Tip from experience: Always use a rust-inhibiting primer designed specifically for metal. If you’re painting over previously rusted areas (even treated ones), make sure the primer is compatible with rust converters if you used one earlier.
Choosing the Right Paint for Durability
Not all paint is created equal, especially when it comes to metal surfaces. For wrought iron, you need a paint that can stand up to the elements and resist chipping, rusting, and fading over time.
Here’s what I always recommend:
-
Use exterior-grade enamel or oil-based paint for outdoor pieces. These are tougher and hold up better to rain, UV rays, and temperature swings.
-
For indoor pieces, acrylic or water-based metal paints can work well, especially if you want faster drying time and easier cleanup.
-
If you're after that smooth, even finish on railings or fences, spray paint made specifically for metal can give you great results, but only if your surface is properly prepped.
Bonus tip: Go for a paint that mentions "rust protection" or "direct-to-metal" on the label, especially for touch-ups or quick jobs.
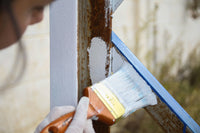
Application Techniques for a Smooth Finish
Brush vs. Spray: Pick the Right Tool
-
Brushes give you more control and are great for touch-ups or small, detailed areas. But cheap brushes can leave streaks or loose bristles behind. Go for a high-quality, synthetic brush made for metal or oil-based paints.
-
Spray paint gives a much smoother finish and is ideal for railings, gates, or anything with curves and tight spaces. Just make sure to use light, even coats and keep the can moving to avoid drips and pooling.
Pro tip: If you're spraying, always start a few inches off the surface and move past it. Don’t stop and start directly on the metal. This avoids blotchy patches.
Thin Coats Are Better Than One Thick One
It’s tempting to load on the paint to finish faster, but that usually leads to drips, bubbles, or uneven texture. Instead, apply multiple thin coats, allowing each one to dry completely before adding the next. This builds up coverage gradually and gives you that clean, even finish.
Surface Must Be Clean and Dry
Before you even open the paint can, double-check that the surface is free from dust, grease, and leftover sanding particles. Even a tiny amount of residue can cause paint to lift or peel. Wipe it down with a lint-free cloth and let it fully dry before starting.
Mind the Weather (If Painting Outdoors)
Humidity, heat, or direct sun can mess with drying times and ruin your finish. Try to paint on a dry, mild day, ideally between 10°C and 25°C (50°F to 77°F), and keep the piece shaded while the paint sets.
Wrought Iron Structural Repairs
Before jumping into repairs, it’s important to take a good look at the overall condition of your wrought iron piece. Sometimes what looks like a minor issue, like a small crack or bend, can reveal deeper structural damage once you inspect it closely. The key is knowing when something can be fixed and when it really needs to be replaced.
You don’t want to spend time and effort patching up a piece that’s too far gone. That’s why it’s worth stepping back and asking: Is this something I can safely restore, or would replacing the part be smarter long-term?
Hiring Professionals for Complex Repairs
Let’s be honest: some repairs go beyond a quick fix. If you’re dealing with serious structural issues, broken welds, or intricate scrollwork that’s been damaged, it’s completely okay to call in a professional. In fact, sometimes it’s the smartest move.
There’s no shame in getting expert help, especially when safety or long-term durability is on the line. A skilled metalworker or welder can restore things properly without compromising the look or strength of your wrought iron. So if a repair feels out of your comfort zone, don’t hesitate to bring someone in.
Maintenance Tips Post-Restoration
1. Stick to a Regular Cleaning Schedule
Even if your wrought iron looks fine, regular cleaning helps prevent dirt, grime, and moisture from building up, things that speed up rust. A quick wipe-down with mild soap and water every couple of months (or more often in exposed areas) keeps your iron looking fresh and extends its life. Always dry it thoroughly afterward.
2. Reapply Protective Coatings as Needed
Paint and sealants don’t last forever. Over time, weather and wear can break down those protective layers. Check your ironwork once or twice a year, especially after winter, and touch up any worn or chipped spots with primer and paint. Keeping that barrier intact is your best defense against rust and corrosion.
3. Do Seasonal Inspections
Take a few minutes at the start of each season to give your wrought iron a good look. Check for early signs of rust, loose joints, flaking paint, or any movement in railings or gates. Catching these issues early can save you from bigger, more expensive problems later, and it’s way easier to fix things when they’re still small.
Conclusion
Sure, this might have given you a bit of a headache just reading through it all, and yeah, there’s no denying that wrought iron can come with its fair share of problems. But that’s exactly why I put together all these techniques, tips, and advice, so you’re not caught off guard. With a little attention and the right approach, you can catch issues early, fix them the right way, and keep your wrought iron looking great for years to come.
Explore our full collection of premium handrails and wrought iron products here. And if you have questions about a specific restoration project or need expert guidance, get in touch with us, we’re happy to help.


