


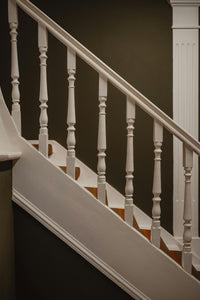
Replacing stair spindles with wrought iron is a simple way to give your staircase a fresh, modern look. Iron balusters are stronger, last longer, and come in all kinds of styles—from classic to sleek and modern. They’re also easier to clean and maintain. If you want to update your staircase, replacing stair spindles with wrought iron is an easy upgrade that makes a big difference.
Before You Start
Tools You’ll Need
-
Saw (metal-cutting blade or reciprocating saw)
-
Drill and drill bits
-
Allen wrench (for tightening baluster shoes)
-
Tape measure
-
Marker or pencil
-
Level
-
Safety glasses
-
Gloves
-
Vacuum or broom (for cleanup)
Supplies You’ll Need
-
Iron balusters
-
Baluster shoes
-
Strong adhesive (like epoxy)
Plan Your New Look
First and foremost, you have to do your research on what types of iron balusters exist and how to match them with your home’s style. If your space is more modern, go for simple straight lines or geometric shapes. For traditional homes, look for scrolls or more detailed designs. Farmhouse style often pairs well with a mix of straight and knuckle designs.
Also think about the pattern—too many intricate details can clutter the space and make small areas feel even smaller. On the other hand, a simple, straight layout can make the space feel cleaner and more open. Choose a pattern that fits your space and doesn’t overwhelm it.
Next, count how many balusters you’ll need. A common rule is two balusters per stair tread, but that can vary depending on your design and local building codes. Measure your staircase and plan your layout before you buy, just to be safe.
This part takes a bit of time, but it’s worth it to plan things out. Replacing stair spindles (balusters) isn’t cheap, so you don’t want to mess up early on and waste money.
How to Replace Wood Stair Spindles With Wrought Iron Ones (8 Easy Steps)
Step 1: Remove the Old Wood Balusters
Start by using the saw you prepped earlier—preferably with a fine-tooth blade or a reciprocating saw—to cut each wood baluster near the base. Wear safety glasses and gloves while cutting to protect your hands and eyes from wood splinters or sawdust. Once cut, gently wiggle the baluster back and forth to loosen it. Some may come out easily, while others might need a little more effort if glue or nails were used during the original install.
Be careful not to damage the handrail or base when pulling the balusters out. One tip is to place a piece of cardboard or a scrap of wood between your tools and the railing to avoid scratches or dents. If a baluster feels stuck, avoid forcing it—try using a flat pry bar or tapping it loose with a rubber mallet instead.
Step 2: Clean the Holes
After removing the balusters, you’ll probably see some dried glue left in the holes. Use a utility knife, chisel, or even a flathead screwdriver to scrape it off. This helps create a clean surface for the new adhesive to stick properly. Take your time and be gentle so you don’t chip or damage the surrounding wood. A vacuum can come in handy here to clear out dust and debris as you go.
If there are still chunks of glue or wood blocking the holes, grab your drill with the right size bit and carefully drill them out. Don’t force it—go slow and steady to avoid widening the hole too much.
Step 3: Measure and Cut the Iron Balusters
This part might seem the most intimidating—cutting wrought iron isn’t exactly a simple task, especially if you’ve never done it before. But with the right tools and a steady hand, it’s doable. Take your time marking each baluster for a snug fit, then use a saw with a metal-cutting blade to carefully cut it down to size. Always wear safety glasses and gloves, and use a clamp if you need extra stability while cutting.
If you're not confident doing this yourself, that's totally fine. You can ask a local metal shop to cut them for you, or reach out to a friend who has experience with this kind of work. It’s a good way to save money without taking unnecessary risks.
Step 4: Slide on the Shoes
Before you start replacing stair spindles with the new iron balusters, make sure to slide the baluster shoes onto each one. It’s easy to forget this step, but it’s a pain to go back once the balusters are in place. The shoes sit at the top and bottom of each baluster and help cover any gaps or rough edges around the holes. They also give the finished look a clean, polished feel.
Once the shoes are in place, tighten the set screws just enough so they stay put for now. You’ll make final adjustments later after all the balusters are in. Use your Allen wrench from the tool list for this part. If you tighten too much too early, you might have a hard time making height or angle changes down the line.
Step 5: Add the Adhesive
Use a strong construction adhesive or epoxy, inject a small amount into both the top and bottom holes where the baluster will sit. A little goes a long way—using too much can cause overflow and make a mess, which is harder to clean up once it dries.
When buying adhesive, check that it’s rated for metal-to-wood bonding and has a strong hold. Some types are quick-drying, so make sure you’re ready to place the baluster right after applying it.
Step 6: Set the Balusters in Place
We’re getting close to the end now. Once the adhesive is in, slide each iron baluster into the holes—bottom first, then top. Push them in gently but firmly so they sit all the way down into the adhesive. If you marked and cut everything correctly, they should fit snug without too much effort.
Make sure each baluster is standing straight before the glue sets. Use a small level from your tool kit to double-check the alignment. Adjust as needed while the adhesive is still workable.
Step 7: Adjust the Height and Angle
Check your balusters one last time before locking everything in. Use your Allen wrench to turn the set screws until each shoe is snug and secure. Don’t overtighten—just enough to hold everything in place firmly.
Step 8: Let Everything Dry and Set
At the end, we have the most important part—and that’s having the patience to let the adhesive cure properly. Check the label on your adhesive for drying time, and avoid touching or adjusting the balusters while it sets. Rushing this part can mess up all the work you just did, so give it the full amount of time to harden and hold everything in place.
While you're waiting, go ahead and clean up any mess. Wipe off any extra glue that may have squeezed out before it dries completely. Sweep or vacuum up dust and scraps left over from cutting and drilling.
FAQs
1. Do I have to replace the handrail too?
-
No, you don’t have to replace the handrail. First, the handrail stays in place because it’s supported by the posts, not the balusters—so taking out the old balusters won’t affect it. Second, if your current handrail looks good with the new iron balusters, there’s no reason to change something that already works.
2. Is this project renter-friendly?
-
No, this project isn’t renter-friendly. It involves drilling, cutting, and using adhesive, which are all permanent changes—better suited for homeowners.
3. Do iron balusters come pre-finished or do I need to paint them?
-
Most iron balusters come pre-finished with a powder-coated color, like black, bronze, or satin nickel. If you want a custom color, you can paint them yourself.
4. How long does it take to replace all the balusters?
-
It depends on how many steps you have and your skill level, but most people can finish the project in a day or over a weekend.
Conclusion
Replacing wood stair spindles with wrought iron ones is a pretty simple task if you’ve got the tools, the motivation, and some basic DIY skills. The trickiest part is that it takes up your time and requires patience and focus.
One last tip: watch a few videos online before you start. Seeing the steps in action can make the whole process a lot clearer and give you more confidence going in. Take your time, plan it out, and you’ll end up with a staircase that looks brand new.
Contact us anytime if you need help with installations or choosing the right wrought iron railing.


